LESSON 8-1 : Using the Rotate, Scale, and Follow-Me Tools

Using Some New Tools

Here, we’ll learn to use the Rotate, Scale, and Follow-Me tools.

  • The Rotate tool does just what it sounds like - it rotates objects. You can use this tool not only to rotate whole objects, but also parts of objects if you select a part of the object and then fold it across edges.

  • The Scale tool lets you enlarge and reduce objects as you like. This is a useful tool in case you want to make changes to an object’s size at any time.

  • The Follow-Me tool lets you move 2D shapes along paths you’ve specified to create 3D shapes. It’s very cool to watch.


Thanks :
Steven Holzner,
SamsTeachYourself Google SketchUp 8 in 10 Minutes

LESSON 8-2 : Rotating Objects

Rotating Objects

The Rotate tool lets you rotate whole objects, or just part of an object.

The Rotate tool first establishes a plane of rotation by orienting itself to the planes formed by the red, blue, and green axes, or any surface you hover over. Then you establish an axis of rotation and rotate the object.

First, we’ll need an object to rotate. We’ll use the Components dialog (as we did in Lesson 6, “Creating Components and Groups”) and bring forth a workstation desk set and orient it the way we want. For this task (and others in this lesson), we’ll work with the familiar Engineering–Feet template.

Here’s how we can rotate a drawing of a workstation:

1. Start SketchUp.

2. Click the Start Using SketchUp button.

3. Select the Window menu’s Components item.

4. Click the down arrow next to the House button and click the Architecture component collection.

5. In the Architecture collection, click the Furniture collection.

6. In the Furniture collection, click the Desks collection.

7. Click the Work Station Desk Set component.

8. Click inside your drawing to draw the desk set, as shown in Figure 8.1. Now we’ll rotate the desk set.

9. Select the Rotate tool in the toolbar (shown in Figure 8.1). Selecting the Rotate tool displays a rotation base, which appears as a double circle, at the location of the mouse cursor. As you move the mouse, SketchUp aligns the rotation base with the underlying surfaces.

FIGURE 8.1 The Rotate tool and our desk.

10. Click the location under the desk around which you want to rotate the desk. This anchors the rotation base and sets the location around which you will rotate the object. You can think of the rotation base as an axle hub for the rotation.

NOTE: The Blue Box Indicates What Will Be Rotated
Note that because of the proximity of the rotation base and the desk, SketchUp surrounds the desk in a blue box to indicate that it has been selected as the target of your rotation operations.

11. After setting the rotation hub, you need to set the rotation axis, the axle around which the rotation will take place. Move the mouse to the end point of the rotation axis. One end point of the rotation axis is automatically the rotation base; the other you set by moving the mouse and then clicking it. The rotation axis is the axis, or axle, around which the rotation will take place.

12. Click the mouse to lock the rotation axis in place. You can see the rotation base and rotation axis we’re using in Figure 8.2. Now you have the rotation base (the rotation axle hub) and the rotation axis (the rotation axle) in place. When you move the mouse, the desk rotates to match.

FIGURE 8.2 A rotation base and rotation axis.

13. Move the mouse to rotate the object. This rotates the selected object in 3D space to follow the movements of the mouse.

14. Click the mouse to lock the object in its rotated position. You can see the new position of the desk in our example in Figure 8.3.

FIGURE 8.3 A rotated object.

That’s how rotation works in SketchUp.

NOTE : You can enter the number of degrees into the Angle. (Figure 8.3.)

Thanks :
Steven Holzner,
SamsTeachYourself Google SketchUp 8 in 10 Minutes

LESSON 8-3 : Rotating Parts of Objects

Rotating Parts of Objects

The Rotate tool lets you rotate part of an object as well, which is great when you want to “fold” part of an object over.

For example, we’ll rotate just part of a cube.

Here’s how it works:

1. Click the Start Using SketchUp button.
2. Select the Rectangle tool and draw a horizontal rectangle.
3. Select the Push/Pull tool in the toolbar and pull the rectangle up into a cube.
4. Select the Line tool in the toolbar.

5. Draw a vertical line on one edge of the cube, as shown in Figure 8.4. Note that when you’re drawing the line, it will turn cyan until it’s parallel to the vertical edges of the cube. This is a useful guide if you want to draw a vertical line.

6. Now we’ll rotate part of the cube around the vertical line. Choose the Select tool in the toolbar.

7. Click the right half of the bisected cube face. This selects that half of the cube face and fills it with blue dots to indicate that it has been selected.

8. Select the Rotate tool in the toolbar.

FIGURE 8.4 A cube with a line.

9. Click the location under the cube around which you want to rotate the selected part of the cube. That is, click directly under the bottom end point of the bisecting line.

10. After setting the rotation hub, you need to set the rotation axis, the axle around which the rotation will take place. Move the mouse to the end point of the rotation axis. That is, move the mouse directly above the top end point of the bisecting line.

NOTE: One End Becomes the Rotation Axis
One end point of the rotation axis is automatically the rotation base; the other you set by moving the mouse and then clicking it. The rotation axis is the axis, or axle, around which the rotation will take place.

11. Click the mouse to lock the rotation axis in place. Now you have the rotation base (the rotation axle hub) and the rotation axis (the rotation axle) in place. When you move the mouse, the desk will rotate to match.

12. Move the mouse to rotate the object. This rotates the selected object in 3D space to follow the movements of the mouse.

13. Click the mouse to lock the object in its rotated position. You can see the new position of the right half of the bisected cube face in our example in Figure 8.5.

FIGURE 8.5 A partially rotated object.

Now you can partially rotate objects in SketchUp.

TIP: You Can Also Use the Move Tool
You can get the same effect as you see in Figure 8.5 with the Move tool if you drag the right-most edge of the cube forward.

Thanks :
Steven Holzner,
SamsTeachYourself Google SketchUp 8 in 10 Minutes

LESSON 8-4 : Locking the Rotate Tool’s Orientation

Locking the Rotate Tool’s Orientation

It’s sometimes hard to get the Rotate tool’s rotation base to use the orientation you want, because it aligns to any underlying surface. And if you have a complex object, what you consider the current underlying surface is not what SketchUp might consider the current underlying surface, which can be frustrating.

One trick you can use is to lock the rotation base’s plane over a surface you like and then move it to the surface you’re having problems with. When you lock the rotation base, it preserves its orientation no matter how what the underlying surface is.

Here’s how it works:

1. Click the Start Using SketchUp button.
2. Select the Rectangle tool and draw a horizontal rectangle.
3. Select the Push/Pull tool in the toolbar and pull the rectangle up into a cube.
4. Select the Rotate tool in the toolbar.
5. Move the rotation base around the various surfaces and planes in the drawing to confirm that the rotation base aligns with the underlying surface. You can see examples in Figures 8.6 and 8.7.

FIGURE 8.6 The rotation base aligns one way.

FIGURE 8.7 The rotation base aligns another way.

6. Now we’ll lock the rotation base in the horizontal position. Move the rotation base to an empty part of the drawing. By default, the rotation base takes a horizontal alignment.

7. Press the Shift key. Pressing the Shift key locks the orientation of the rotation base.

8. With the Shift key down, move the rotation base around the various surfaces and planes in the drawing to confirm that the rotation base stays horizontal. You can see examples in Figures 8.8 and 8.9.

FIGURE 8.8 The rotation base is horizontal.

FIGURE 8.9 The rotation base stays horizontal.

There you have it- now you can keep the rotation base the way you want it.

Thanks :
Steven Holzner,
SamsTeachYourself Google SketchUp 8 in 10 Minutes

LESSON 8-5 : Scaling 2D Objects

Scaling 2D Objects

You can use the Scale tool to enlarge or reduce objects in SketchUp. Here’s how the Scale tool works for 2D objects :

1. Click the Start Using SketchUp button.

2. Select the Rectangle tool and draw a horizontal rectangle.

3. Select the View menu’s Toolbars item. This opens a submenu.

4. Select the submenu’s Large Tool Set item. This opens the large toolbar.

5. Select the Scale tool in the large toolbar. The Scale tool is the tool that displays an image of a rectangle being expanded.

6. Click the horizontal rectangle. The rectangle has sizing handles added to it, as you can see in Figure 8.10.

FIGURE 8.10 The Scale tool and sizing handles added to a rectangle.

7. Press the mouse button on a sizing handle. The sizing handle you choose determines how the rectangle will be stretched when you move the mouse, just as when you resize a window.

8. Drag the mouse to stretch the rectangle in the direction you’ve chosen. The rectangle stretches as you pull it.

9. Release the mouse button. When you do, the rectangle is fixed in place at its new size, as shown in Figure 8.11.

FIGURE 8.11 A newly resized rectangle.

That’s all it takes to resize objects—just use the Scale tool.

TIP: Stretching Objects in Different Directions
Note that if you pull one of the corner sizing handles, the object will be scaled so that it retains its proportions in both dimensions. But if you pull on an edge sizing handle, not a corner one, the object will be pulled in only the corresponding dimension, deforming the object.

Thanks :
Steven Holzner,
SamsTeachYourself Google SketchUp 8 in 10 Minutes

LESSON 8-6 : Scaling 3D Objects

Scaling 3D Objects

As you’d expect because SketchUp is a 3D program, you can also scale objects in 3D. To see this in action, we’ll draw a cube and then scale it to make it bigger.

Here’s how it works:

1. Click the Start Using SketchUp button.
2. Select the Rectangle tool and draw a horizontal rectangle.
3. Select the Push/Pull tool in the toolbar and pull the rectangle up into a cube.
4. Select the Select tool in the toolbar.
5. Draw a selection rectangle around the cube with the mouse.
6. Release the mouse button. When you do, the cube is selected.
7. Select the View menu’s Toolbars item. This opens a submenu.
8. Select the submenu’s Large Tool Set item. This opens the large toolbar.
9. Select the Scale tool in the large toolbar.

When you select the Scale tool, the cube has sizing handles added to it, as you can see in Figure 8.12.

FIGURE 8.12 Sizing handles added to a cube.

10. Press the mouse button on a sizing handle. The sizing handle you choose determines how the cube will be stretched.

11. Drag the mouse to stretch the cube in the direction you’ve chosen. The cube stretches as you pull it.

12. Release the mouse button. When you do, the cube is fixed in place at its new size, as shown in Figure 8.13.

FIGURE 8.13 A newly resized cube.

Now you can resize objects in 3D.

TIP: Clicking a Cube Selects One Face for Scaling
If you don’t select the whole cube before selecting the Scale tool, but simply click a cube face with the Scale tool, that face (only) is selected for resizing. See the next task for more details.

Thanks :
Steven Holzner,
SamsTeachYourself Google SketchUp 8 in 10 Minutes

LESSON 8-7 : Tapering Objects in 3D

Tapering Objects in 3D

Drawing regular 3D items is nice, but what if you want to taper an object instead? What if you have a cylinder as shown in Figure 8.14?

FIGURE 8.14 A cylinder.

However, you want to change the shape to be larger at the top, perhaps similar to what you see in Figure 8.15 instead. What can you do?

You can create the shape you see in Figure 8.15 using the Scale tool. Here’s how it works:

1. Click the Start Using SketchUp button.

2. Select the Circle tool and draw a horizontal circle.

FIGURE 8.15 A deformed cylinder.

3. Select the Push/Pull tool in the toolbar and pull the circle up into a cylinder.

4. From the Large Tool Set select the Scale tool (open the Large Tool Set from the View menu if necessary).

5. Click the circle at the top of the cylinder. The circle has sizing handles added to it.

6. Click the mouse button on a sizing handle. The sizing handle you choose determines how the top circle of the cylinder will be stretched when you move the mouse.

7. Drag the mouse to stretch the cylinder in the direction you’ve chosen. The cylinder stretches as you pull it.

8. Release the mouse button. When you do, the cylinder is fixed in place at its new size, as shown in Figure 8.15.

But what if you wanted to create a regular funnel shape instead? Take a look at the next task.

Thanks :
Steven Holzner,
SamsTeachYourself Google SketchUp 8 in 10 Minutes

LESSON 8-8 : Scaling from the Center of Objects

Scaling from the Center of Objects

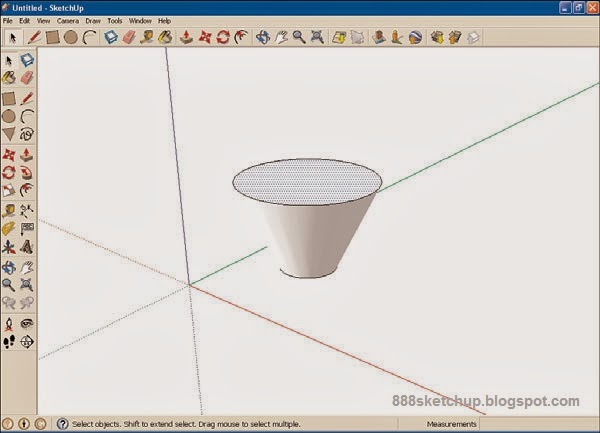
So far, we’ve tapered an object by pulling one edge. But to taper an object more regularly, you should taper from the center of the object. Suppose you started with the cylinder in the previous task but wanted to end up with the funnel shown in Figure 8.16.

FIGURE 8.16 A funnel.

Here’s how to create the funnel:

1. Click the Start Using SketchUp button.

2. Select the Circle tool and draw a horizontal circle.

3. Select the Push/Pull tool in the toolbar and pull the circle up into a cylinder.

4. From the Large Tool Set select the Scale tool (open the Large Tool Set from the View menu if necessary).

5. Click the circle at the top of the cylinder. The circle has sizing handles added to it.

6. Press the Ctrl key. Pressing the Ctrl key makes the Scale tool scale objects from their center, which is what we want in this case.

7. Click and hold the mouse button on a sizing handle.

8. Drag the mouse to stretch the cylinder into the funnel shape.

9. Release the mouse button. When you do, the funnel is fixed in place at its new size, as shown in Figure 8.16.

That lets you scale objects from their center.

Thanks :
Steven Holzner,
SamsTeachYourself Google SketchUp 8 in 10 Minutes

LESSON 8-9 : Setting Exact Scale

Setting Exact Scale

What if you had an object and you wanted to expand it by exactly a factor of two? You can set the exact amount you resize an object by with the Scale tool as follows, where we’re expanding a cube by a factor of two:


1. Click the Start Using SketchUp button.

2. Select the Rectangle tool and draw a horizontal rectangle.

3. Select the Push/Pull tool in the toolbar and pull the rectangle up into a cube.

4. Select the Select tool in the toolbar.

5. Draw a selection rectangle around the cube with the mouse.

6. Release the mouse button. When you do, the cube is selected.

7. From the Large Tool Set select the Scale tool (open the Large Tool Set from the View menu if necessary).

8. Press the mouse button on a sizing handle.

9. Drag the mouse to stretch the cube in the direction you want.

10. Release the mouse button.

11. Enter the factor by which you want to scale the cube. In this example, we’ll scale the cube by a factor of two, so type 2.

12. Press Enter. When you do, the cube is expanded from its original
size by a factor of two.

TIP: Factors Greater Than One Are Not Needed
Note that you can scale to a factor less than one if desired. Factors of less than one will reduce an object’s size. For example, a factor of 0.5 will reduce an object to half its original size.

And that’s setting exact scale.

Thanks :
Steven Holzner,
SamsTeachYourself Google SketchUp 8 in 10 Minutes

LESSON 8-10 : Using the Follow-Me Tool

Using the Follow-Me Tool

The Follow-Me tool lets you drag shapes down a path you specify. Take a look at the object in Figure 8.17.

FIGURE 8.17 A curved object drawn using the Follow-Me tool.

Sketchup 2013

Can you draw that in SketchUp?

You sure can. All you need to do is to draw a circle, set up a curved path, then move the circle along the curved path with the Follow-Me tool (also shown in Figure 8.17). The Follow-Me tool lets you move shapes along paths to make them 3D. Here’s how creating the shape shown in Figure 8.17 works:

1. Click the Start Using SketchUp button.

2. Select the Circle tool and draw a circle like the one shown in Figure 8.18.

FIGURE 8.18 A circle.

3. Select the Arc tool in the toolbar.

4. Click the mouse in your drawing at one end of the path you want to pull the circle along.

5. Click the mouse at the other end point of the path you want to pull the circle along.

6. Pull the arc into the shape you want the circle to be pulled along to create your 3D object.

7. Select the Select tool.

8. Click the circle to select it.

9. Select the Move tool.

10. Move the circle to the end of the arc, as shown in Figure 8.19.

FIGURE 8.19 A circle with an arc.

11. From the Large Tool Set select the Follow-Me tool (open the Large Tool Set from the View menu if necessary).

12. Now we’re ready to use the Follow-Me tool. If the circle isn’t selected, select it with the Select tool and then select the Follow-Me tool again.

13. Use the mouse to drag the circle along the arc. The Follow-Me tool senses that you’re following the arc and keeps the circle moving along it to draw the shape you see in Figure 8.17.

TIP: You Don’t Have to Drag the Follow-Me Tool
You don’t have to drag the Follow-Me tool along a path if you don’t want to. Simply select the edges that form the path you want with the Select tool so they appear as dotted lines (and form a connected path). Then select the Follow-Me tool and click the shape you want to have the Follow-Me tool drag around the path you selected automatically.

The Follow-Me tool is invaluable if you want to create a shape by moving another shape along a certain path.

Thanks :
Steven Holzner,
SamsTeachYourself Google SketchUp 8 in 10 Minutes